Buying a used RV can be a great way to save some money. Just like cars, RV’s depreciate as soon as they are bought new and driven off of the lot. Unlike cars, RV’s are often purchased and then not used, so you might be able to score a heck of a deal on an RV that has very little wear.
On the other hand, RV’s have a lot of parts which means that when you buy a used RV, there are a number of things you need to inspect out before getting out your checkbook. Some RV’s that aren’t used much by their owners have may have suffered neglect.
This comprehensive free guide will tell you what to look for when buying a used RV so you don’t make a bad investment. If you are looking for a good book beyond this guide, we recommend The Ultimate RV Pre-Purchase Inspection Checklist : How To Inspect Your New RV.
Checking Out the Automotive Parts
When inspecting the RV, you should with the automotive parts to make sure they are in good order. If it can’t go anywhere because it doesn’t run or has been damaged, then you should just pass it up and move on to one that does.
Not all of the suggestions in this section apply to travel trailers and 5th wheels, but some do, so don’t skip over it if you aren’t getting a motorhome.
Pro Tip: It helps if you have a second person with you in order to watch for things you missed and help you with certain tasks during the inspection. Bring a couple of flashlights (headlamps work best) as well so you can peer into dark spots and get a good look up under the rig.
Ultra Pro Tip: If you are seriously thinking about buying an RV, get yourself an endoscope inspection tool. For less than $40 you can peek into all of the nooks and crannies that even the seller hasn’t seen!
ASK FOR MAINTENANCE RECORDS
Usually, a seller who is proud of his or her RV maintenance will volunteer these as soon as you come to look at the RV. People who either aren’t concerned or don’t keep good records may not think about it, but be sure to ask. Even if they produce a couple of slips of paper instead of a full binder, you might find good information on the mechanic’s notes. (If you are looking for a pre-printed log book, here’s a great one for keeping your own records.)
You might also consider asking if good maintenance records have been kept when deciding which RV’s you want to drive to see. This one factor may help narrow the pool and save you a lot of time and gas money.
When inspecting records, look for the frequency of oil changes – were they regular and according to the manufacturer’s recommendation, or were they done in a haphazard manner? Also, if the vehicle is around or over 60,000 miles, see if you can find out if the timing belt has been changed. If the vehicle is nearly 100,000 miles and the owner has never had this done, you may be looking at a job of $300-750, so factor this into your negotiations.
INSPECT THE TIRES AND DISC BRAKES
Check wear on tires, look for cracks in the sidewalls, and try to see if you can find any places where the tire has been plugged. Tires are made of rubber – just like rubber bands – and they age and rot the same way. Although tires are a much higher quality rubber, age is a significant factor, even if the tread is pristine. Generally, tires should be replaced every 6 years, regardless of wear. This time frame may be even less if the tires have been in a very hot climate or have spent any time near the coast as these factors will age the rubber even faster.
Use your hands to feel for cracks as it is possible to visually disguise them by using tire black. Ask when the tires were last replaced. Are all of the tires the same make and brand? Don’t forget to inspect the spare tire. This is money you will have to spend if it is not in good repair.
One quick way to tell the age of a tire is to look at the numbers and letters that are on the sidewall of the tire. There are a lot of things there, so snap a photo and go back to look at it later if you can’t tell right away. You are looking for the US DOT code which should be 4 digits long. The first two digits represent the week and the second two digits represent the year. For example, a tire with the code 0815 would have been made in August of 2015. Tires older than the year 2000 have a three digit code which is much harder to decipher. If the RV has tires dating prior to the year 2000, then it doesn’t really matter what that code says specifically. They should be replaced.
For a very good instructional video on how to interpret tire codes, check out this video at Edmunds.com. It will also show you whether or not your tires are rated for the load of the RV or if the owner tried to get away with purchasing a cheaper tire not rated for RV use to save a few bucks.
If there is any question about the tires, plan on replacing them and tell the seller that you will be doing this. You can use this as a strategy to negotiate your price.
On the front tires you may be able to see the disc brakes either through the spokes of the hubcaps or by climbing under the rig and looking at the wheel from behind. Disc brakes that have scoring have some damage, so be aware that you might have brake work ahead of you.
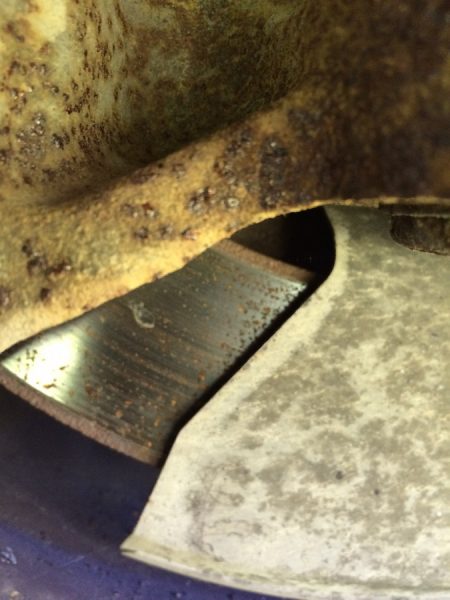
On the front tires you may be able to see the disc brakes either through the spokes of the hubcaps or by climbing under the rig and looking at the wheel from behind. Disc brakes that have scoring have some damage, so be aware that you might have brake work ahead of you.
The disc breaks pictured here have 10,000 miles of cross country travel on them. They have been used in rough conditions, including gravel and dirt roads, mountain driving with a great deal of weight to stop, and residing for a number of months in a coastal environment.
You can see some scoring of the rotors along with rusty specs. The scoring is not deep when felt by hand, and the rust is from sitting on the coast. They have life left in them, but they should be monitored closely for further wear given the amount of weight they are responsible for stopping.
LOOK FOR LEAKS
Open the hood and look for drips and leaks. Be sure to check the ground as well. Start the engine and look again to see if this caused any leaks to appear. If the engine is dirty, you might ask the seller if it is ok to wash off the gunk as this will also help you spot leaks. Take particular note if you see a very dirty engine, but some spots look very clean. There may have been a leak near that area that got wiped off taking the dirt with it.
Pro Tip: Your nose is as important as your eyes in terms of finding leaks. If you smell anything like burnt oil, burnt rubber, gasoline, a sweet, syrupy smell, or the smell of rotten eggs These may indicate oil leaking onto the exhaust system, a slipping drive belt/loose hose, a bad gas line/fuel injector, coolant leak, or bad catalytic converter, respectively. If you notice any of these problems, find out how much the repair will cost by calling around town to automotive shops before making an offer.
CHECK THE BATTERIES
One of the quickest ways to assess whether a vehicle has had good maintenance is a visual inspection of the battery. If it is excessively corroded, then you might want to look for another RV. Cleaning off battery terminals is about the easiest job there is. Any 12 year old could do it if shown how. If the seller hasn’t bothered with this simple step, you can pretty much be sure that the only time things got maintained was after they had a problem.
Get out your multi-meter and check the automotive battery for charge. You should get a 12V or slightly better charge on a good battery. If it is not holding that much charge, you will likely be replacing it soon. While you have out your multimeter, check the house battery(ies). Many house batteries are 12V batteries, but some people swap them out for smaller golf-cart style batteries that are 6 volt and wire them together to make 12V. Ensure you are getting a good 12V+ or 6V+ charge out of these batteries.
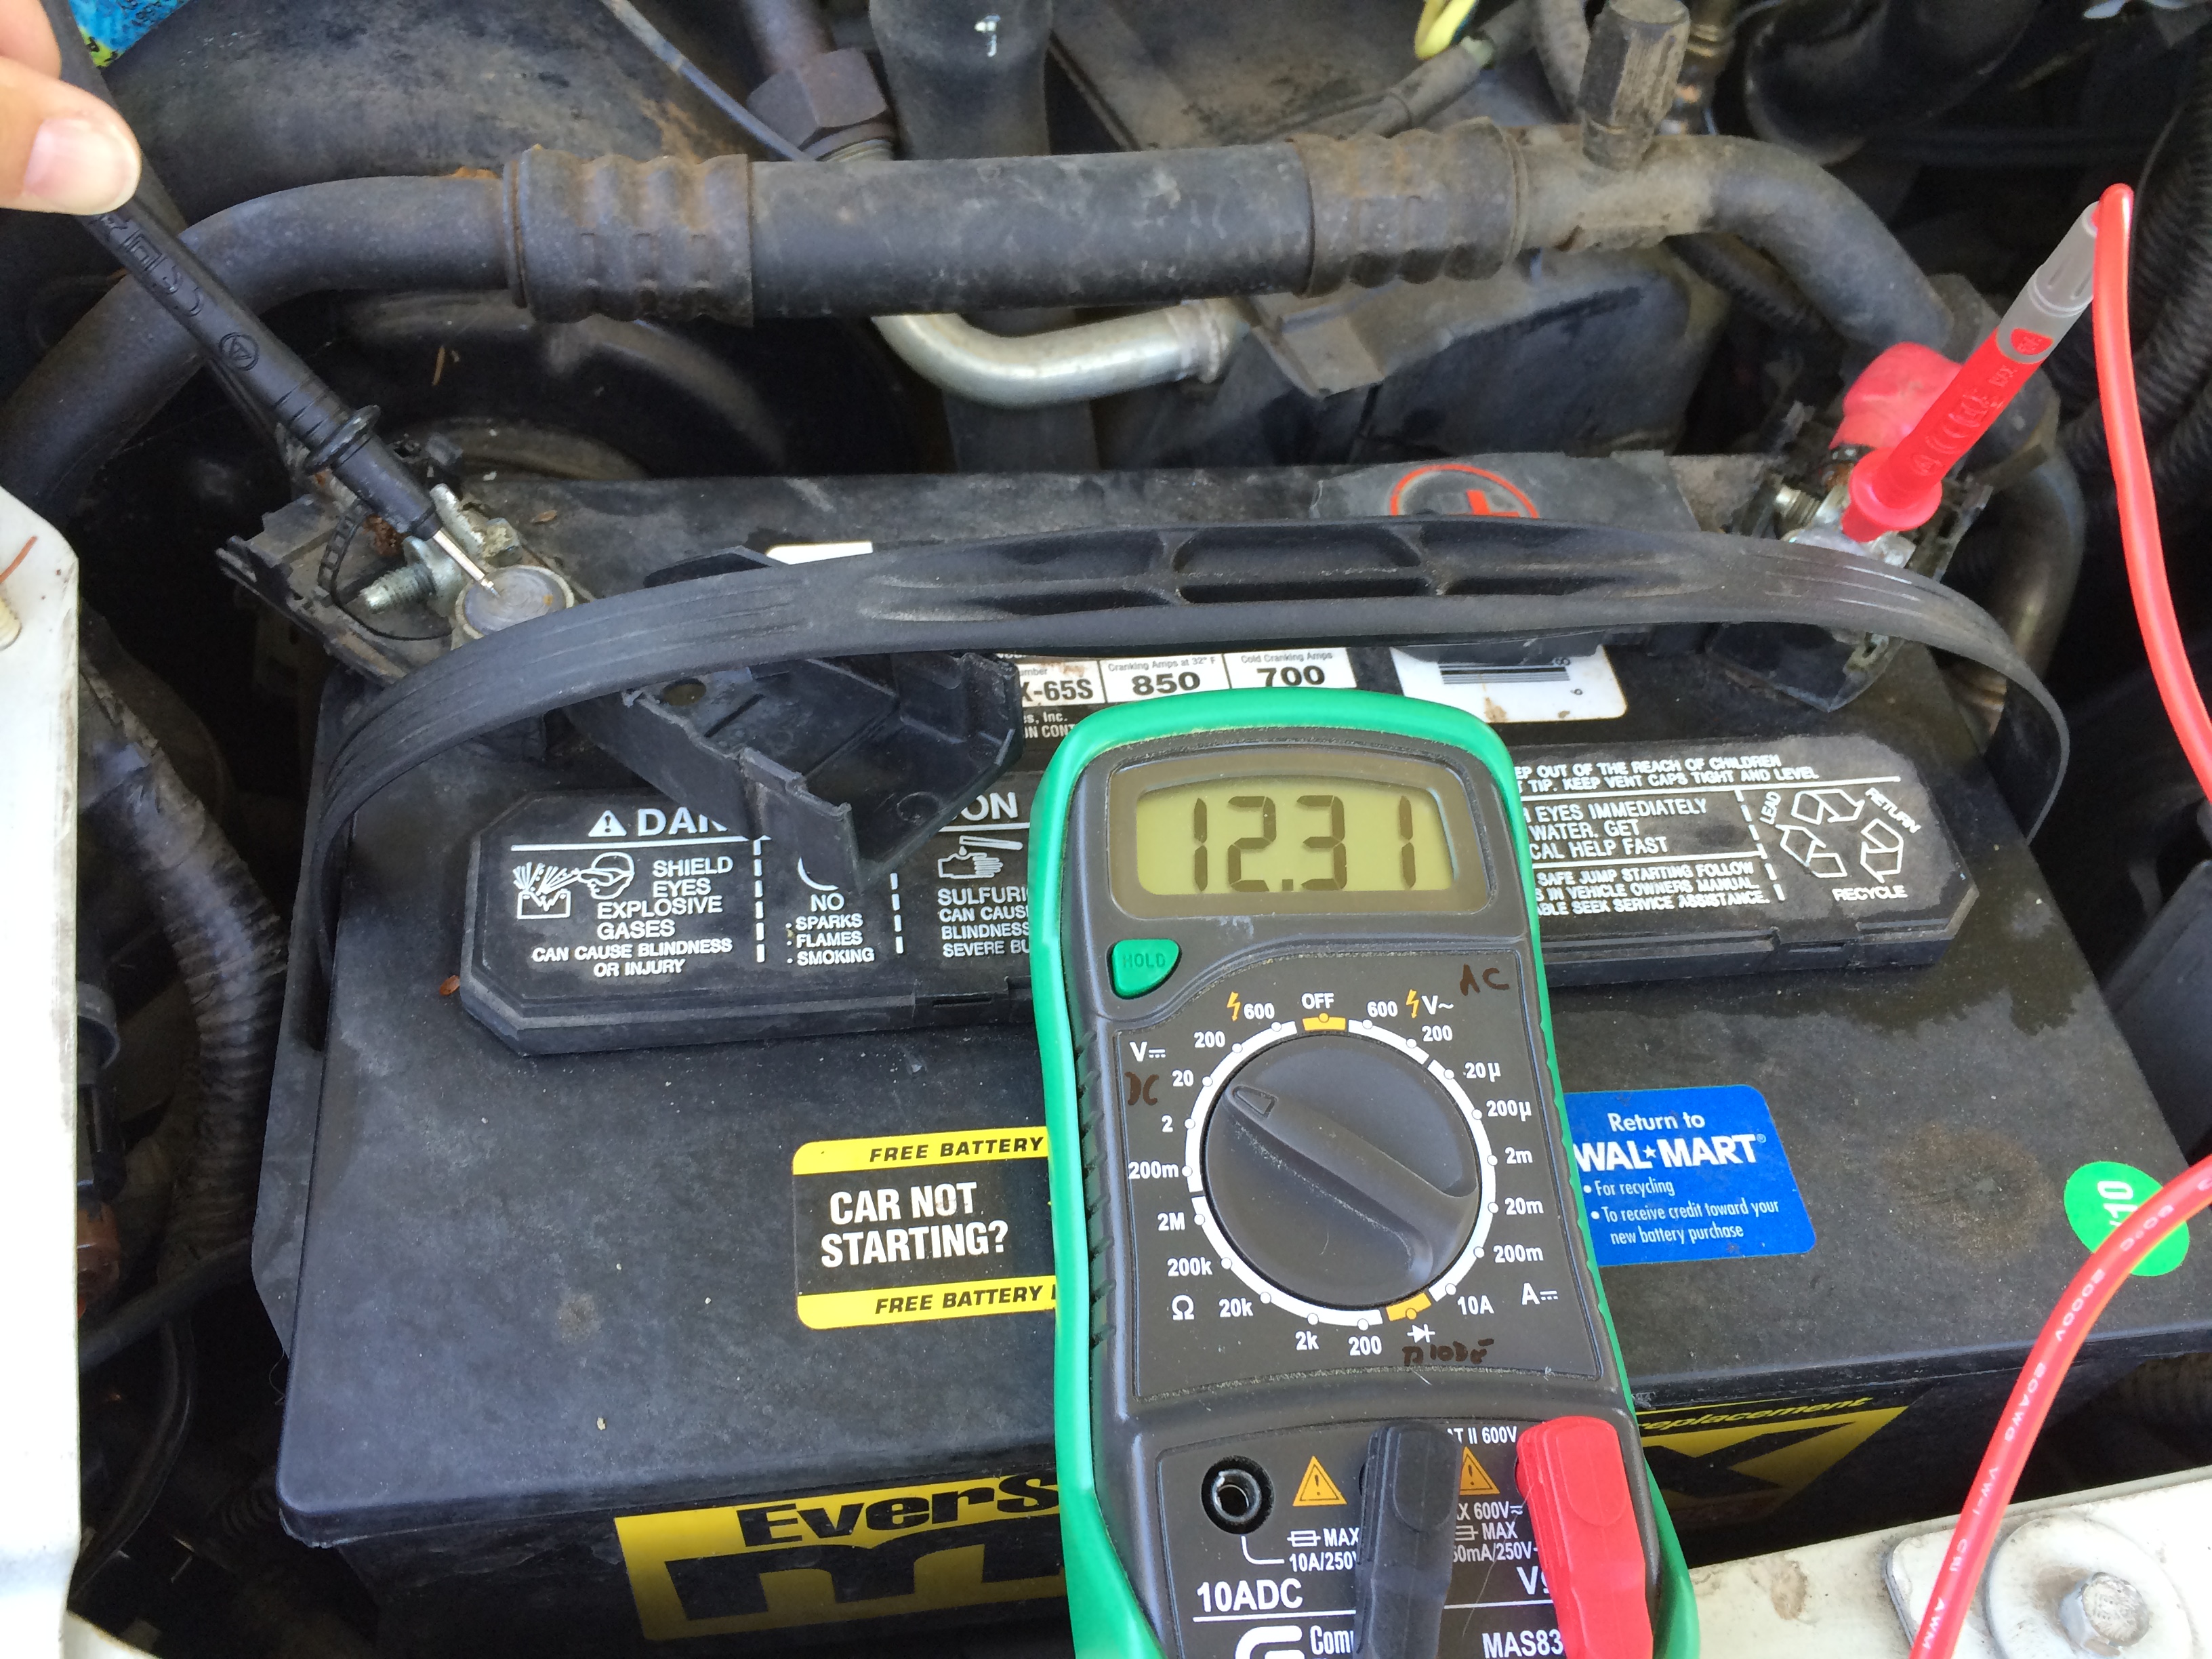
Pro Tip: Never rely on someone telling you that the battery was recently replaced. That doesn’t tell you anything about how the battery was cared for and that can make a world of difference in battery health. A new battery that has been discharged a number of times below 50% can be badly damaged and will need to be replaced soon.
EXAMINE THE BRAKE LINES
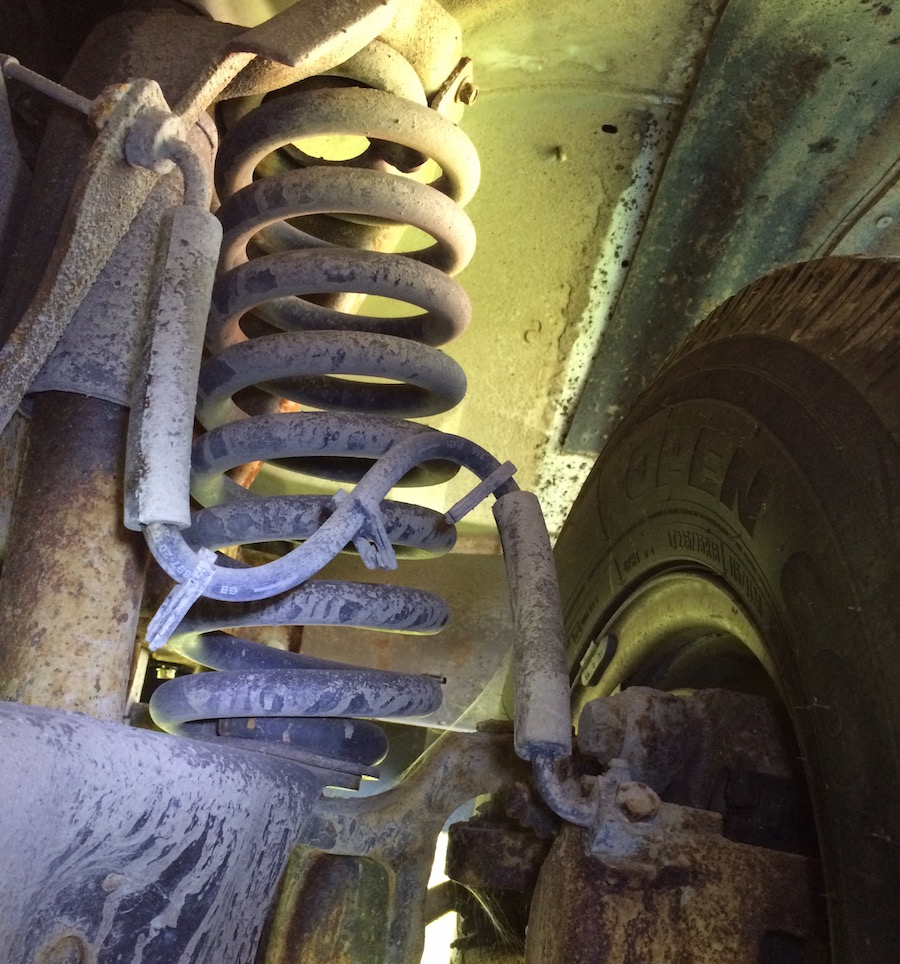
Check brake lines to see if there are any cracks or obvious fluid leaks (you may see moisture or dried fluid), rust on the metal parts of the brake lines, or fluid on the inner surfaces of your wheels. Having a paper towel with you and blotting it along the brake lines will help you spot leaks more effectively.
LOOK FOR RUST, PATCHES, AND FRAME DAMAGE
While you are under the RV, look to see how much rust is present. This will give you an idea of where the RV has been stored. If it has been in the North during winter or along a coast, there may be a good degree of rust from salt.
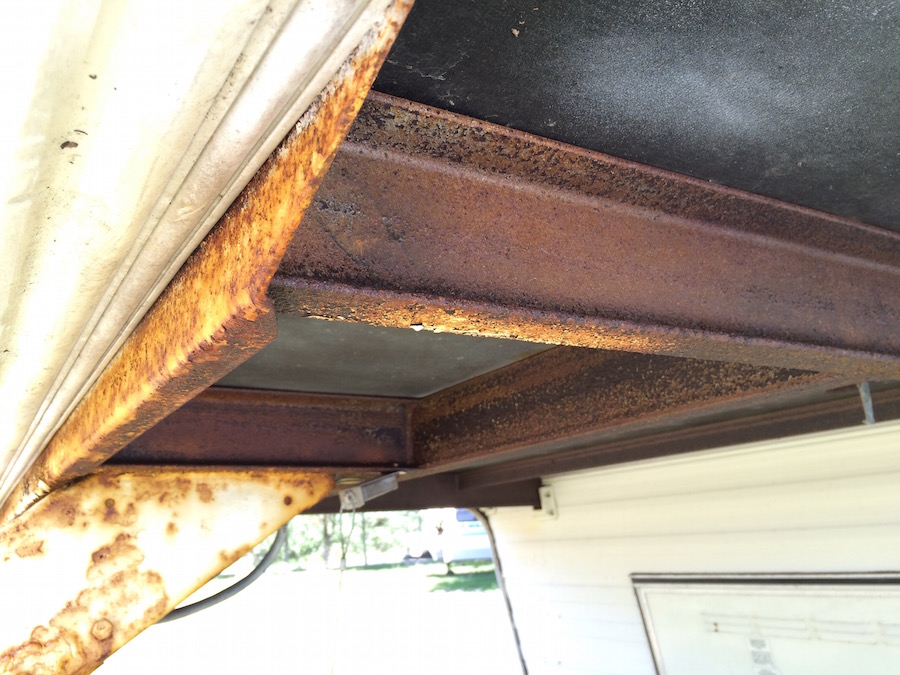
Do you see any patches in the flooring? What about the frame? Does it look at all bent? If so, this could indicate a wreck. Other tell-tale signs include welded spots on the frame that have no apparent rhyme or reason. If you aren’t sure what you are looking for and you don’t have a mechanic friend along with you, snap a few photos to show to someone later.
If the rig shows some signs of rust, but nothing terrible, you might opt to use a rust-prevention paint like this one that will seal the rust and prevent it from spreading. You should always remove as much rust as possible first using a metal prep product.
ASK ABOUT WHEEL BEARING MAINTENANCE
Ask the seller about when the last time wheel bearing maintenance was done on the RV. Hopefully, there will be paperwork available to back up this answer because this isn’t something you can check quickly in an inspection. Wheel bearings are often not thought about and are neglected. Proper maintenance varies from one vehicle to the next. Investigate the requirements ahead of time for the RV you are going to inspect. If the seller can’t prove that maintenance has been done, then you may be able to get a few more dollars off the asking price.
Blowouts and wheel failures are often a result of poor wheel bearing maintenance. Heat can build up due to friction in the bearings and transfer out to the tire causing it to expand and eventually blow out. In a worst case scenario, a wheel can come off due to a bad bearing. This can be fatal when traveling at speed.
CHECK THE HITCH MOUNT, BALL, AND JACK
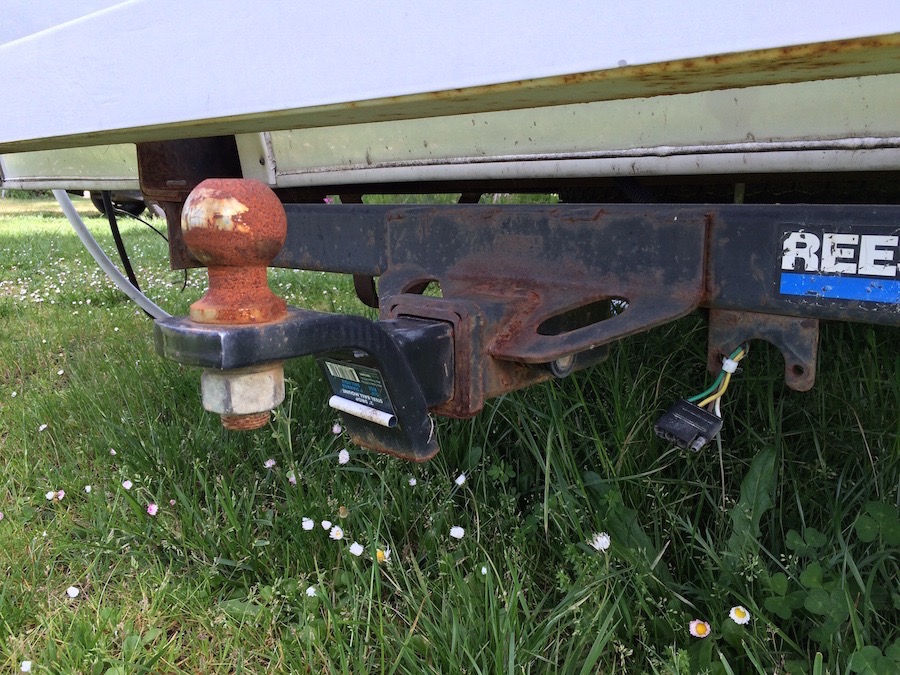
If the RV you are looking to buy has one, check the hitch mount and/or to see if it is in good condition. Is the ball rusted? Does the jack work?
CLEAR THE AIR
Climb in the cab and check for air fresheners. Remove them and keep the doors open to allow it to air out as you do your inspection. When you are completely done with everything (including the house part of the coach) shut all of the doors. Spend a bit of time outside talking to the seller to clear your nose. Then, return to the cab and see if a smell has become evident.
TEST THE WINDOWS AND DOORS
Open and close the driver and passenger doors. Lock and unlock them with the key from the outside and then by hand on the inside. Next, roll the windows up and down to ensure they are operational. Doors that don’t close flush or have to be jiggled to lock them may indicate damage to the body.
CHECK UNDER THE CARPET
If you can peel back the carpet, do so and look for any signs of rust. If you can’t move the carpet, at least lift up the floor mats and see if there are any tell-tale signs of water damage.
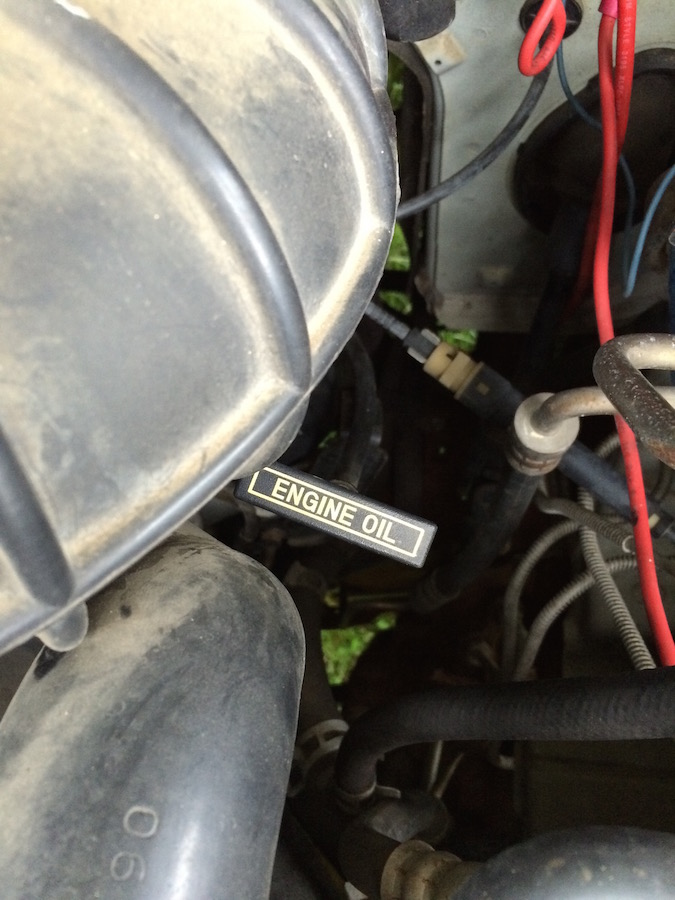
CHECK THE OIL
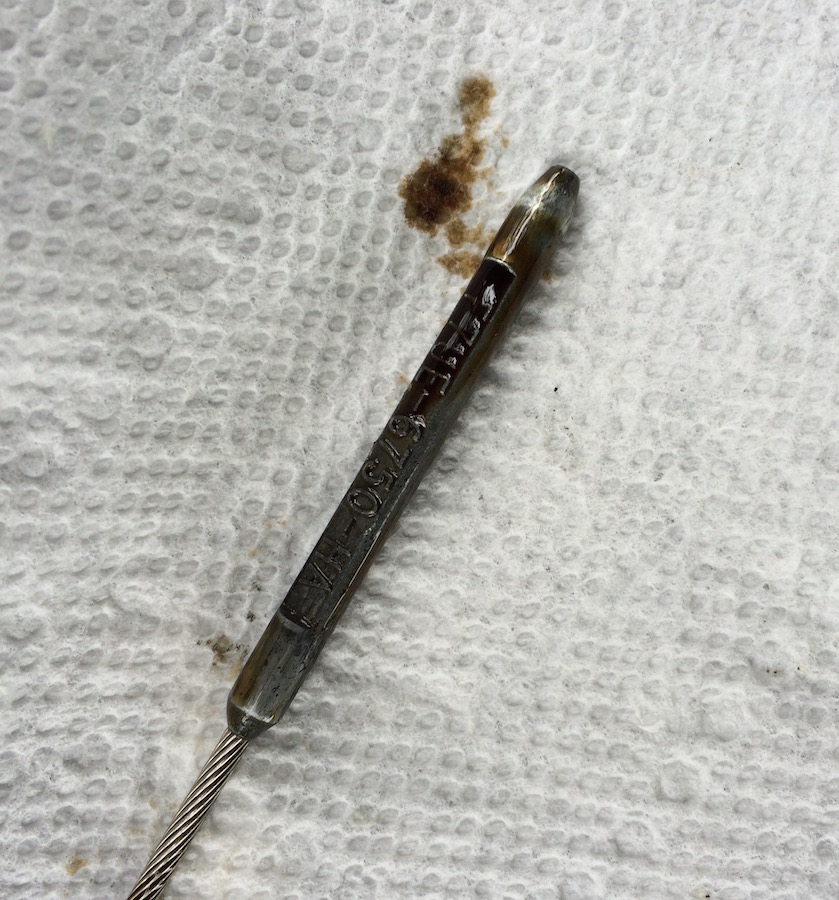
Grab a paper towel and check the oil. Look both at the oil level and at the color of the oil. If the oil is low, it may indicate three things: either the engine is burning oil, there is a possible leak, or it has been a very long time since the oil has been changed. Ask the seller when the last oil change was. If they indicate it has been a long time, know that the engine has probably suffered some extra wear.
What you hope to find when you check the oil are a nearly full level and clean oil which is the color of iced tea. If the oil you see is dark brown or black, the oil is either old or the engine is consuming it.
LISTEN TO THE ENGINE & CHECK DASH WARNING INDICATOR LIGHTS
Before you turn on the engine, feel it so see if the seller may have started it just before you arrived. They may be trying to hide what a cold start sounds like which can be very telling to the condition of the engine or the battery may have been drained and it might have required boosting before starting.
Have your helper stand near the exhaust and watch when you crank it. If they see blue smoke, the engine has probably suffered some wear and is likely burning oil. Turn on the engine and listen for any abnormalities such as knocks, ticks, or rattles. These will usually be most apparent from a cold start.
Once the engine is running, all of the dash warning indicator lights should go off. Be very wary if you see a “check engine” or low oil indicator light.
CHECK THE TRANSMISSION FLUID
Checking the transmission fluid is a quick and dirty way to spot existing transmission problems.
To check the transmission fluid, you will need to locate the transmission fluid dipstick. It will look very similar to the oil dipstick and may be located in a couple of different places depending on if the car is front or rear-wheel drive. On a front wheel drive, it will be towards the front of the engine and on rear-wheel and 4-wheel drive it is located near the back of the engine.
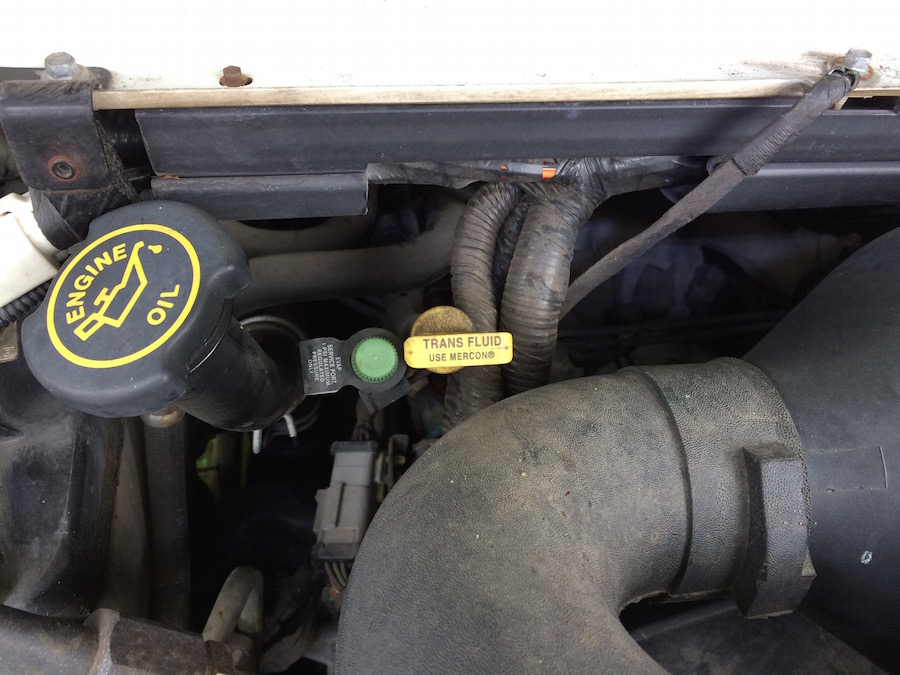
When checking the transmission fluid, the engine should be running and the vehicle should be in park or neutral. Transmission fluid should be a translucent pink color and have a distinctively sweet smell. If the fluid looks dirty, has particulate matter in it, or smells burnt, then you likely have a transmission problem.
This transmission fluid is still nice and bright pink, indicating that it is still in good shape.
Initially, it looked like the brown specs may be metal filings on the dipstick, which would show that the transmission is wearing and may be failing. Normally metal filings should be caught either by a magnet in the bottom of the transmission pan or by the transmission fluid filter. Leaving metal filings in the fluid can act like sandpaper in the transmission.
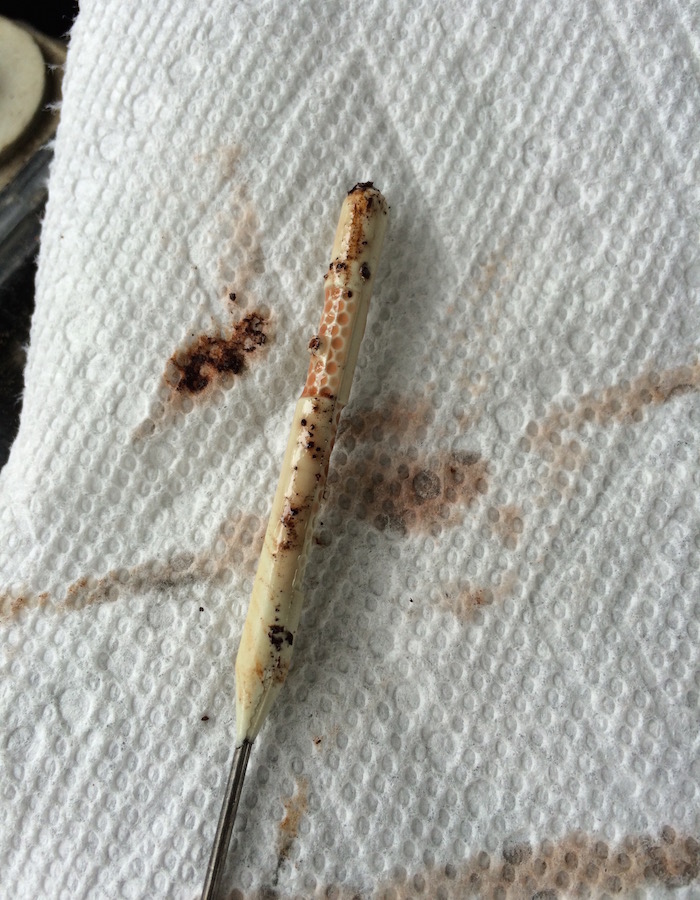
Upon further examination and research of this particular vehicle (Ford 1997 E-350), it was found that the transmission dipstick tube through which the end of the dipstick must pass often rusts, causing this debris to show up when you pull out the dipstick. This would explain why the transmission fluid still looks so good, yet there is debris in it. Usually, if there is a problem with a transmission and metal filings are this prevalent, the transmission is also overheating causing the transmission fluid to burn and become brown.
TEST THE LIGHTS AND SIGNALS
Test the headlights, turn signals, brake lights, hazard signals, and running lights (these are usually located along the top back and sides of the RV). This is a good time to put your friend to use while you walk around and look. If you don’t have a friend along, ask the seller to operate the lights and signals as you do a walk-around.
EXAMINE THE AC & HEATER
Try running the heat and air conditioner. Do they heat and cool? Are all vents operational? Are there any strange smells or noises? It’s pretty normal to have a bit of a funky smell the first time a heater is run after sitting stagnant for a while. Let it run for a bit and keep the windows and door open to air that out. See if there continues to be a strange smell.
If you get strange smells that don’t dissipate fairly readily, you may be looking at some sort of damage in the roof (air conditioning vents) or floor (heating vents). This may be due to water, mice, etc. Yes, mice have been known to be in RV ceiling ducts! If you see any evidence of this type of activity, pass immediately.
To repair that kind of damage, you are looking at tearing off the entire roof which can only be done by specialty RV repair shops. I once heard of an RV less than a year old that was totaled out by the insurance company because there was extensive mouse infestation in the ceiling. The repair would be too extensive to bother with it.
TRY TO GET YOUR JAM ON
Test the radio, CD player, and/or MP3/Pandora applications (if applicable). In some cases you may even get a tape deck or 8 track to test. Now if you could only find that box full of John Denver and Neil Diamond 8 tracks… lol
Examining the Coach of the RV
Before you even start looking at the coach section of the RV, ask the seller if there is a manual for the RV. Most people keep these because there is a lot of important information about the RV and its appliances and add-ons that have been made. The manual is likely to be a 3 ring binder full of individual manuals for the different parts of the RV. Keep this handy as you do your inspection, as it may hold the answer to many of your questions.
TEST OUT THE JACKS / STABILIZERS
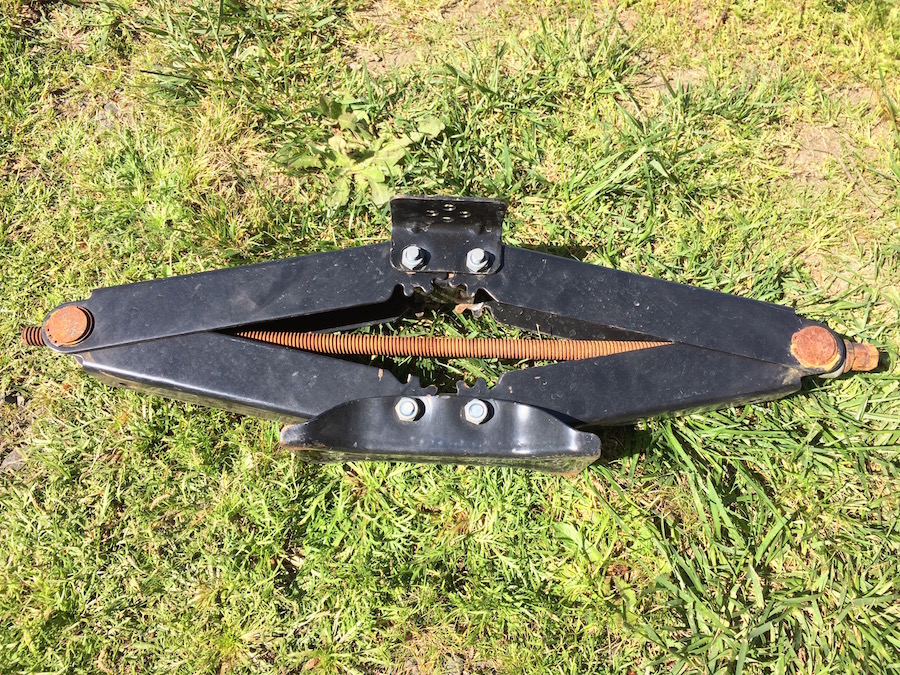
Most every RV comes equipped with stabilizer jacks. Normally there are 4 of them, one for each corner of the RV. These are used for stabilization only – not for major leveling. You should use blocks under the wheels or leveling ramps to correct major level imbalances.
Scissor jacks are the most common form of jack you will find on an RV, although in the fancier style Class A models you are likely to encounter hydraulic or electric levelers that are operated via controls on the inside of an RV. Hydraulic levelers are very popular, but if they aren’t maintained and a leak happens, they can automatically deploy when they aren’t supposed to. That could be a bad thing if you are driving down the interstate.
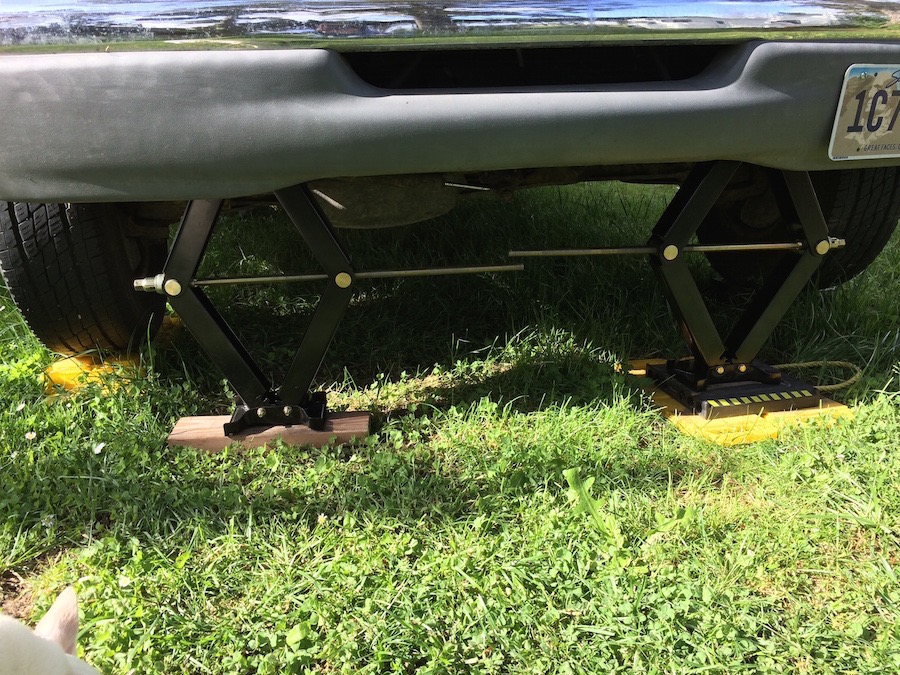
Back to scissor jacks… You should find a crank handle stashed somewhere in a hatch in the RV. Once you locate this you should crank the jacks down and up. Do they move smoothly, or do they stick and have to be forced?
A pair of decent scissor jacks can be bought for about $80-100. There are cheaper models where you can get 4 scissor jacks for that price. If the ones that come on the RV aren’t in good shape, take this into account when negotiating the final sales price.
LOOK AT THE SIDING
Examine the outside walls of the coach. Look for any ripples or bows in the exterior material. If you see anything, note its proximity to any windows or vents. If it is below an opening of this nature, there is a good chance that there is a leak there. If the ripple is higher than the window or vent, there may be a leak in the roof.
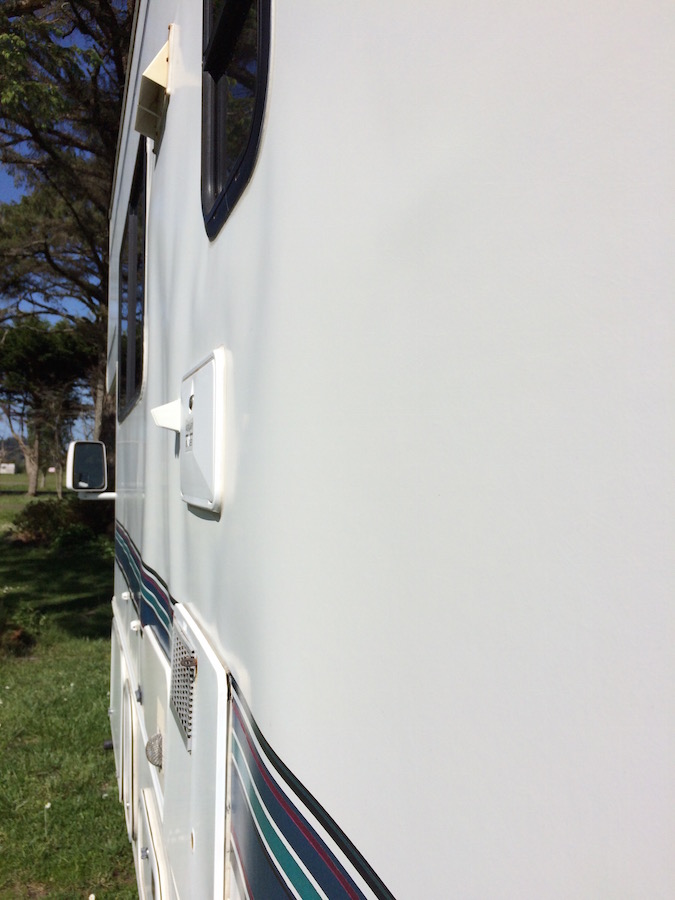
It is possible that the siding can delaminate (come away) from the inside walls due to extreme heat. More often than not, it’s a water issue. Be sure to look for water inside at that spot.
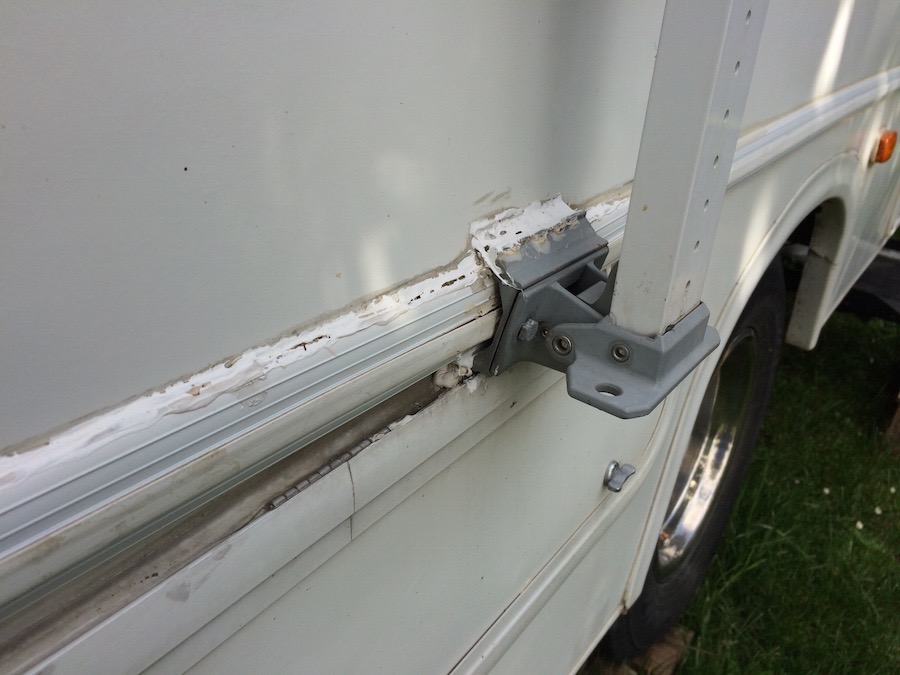
The lag bolts that hold it onto the RV actually go straight into the floor of the RV. The long railing you see is what covers the screws that are used to attach the siding to the floor. In a case like this, you can be certain that there is wood rot on the floor and siding in this area. You may not see this inside because it may be hidden behind closets or other fixtures.
EXAMINE THE ROOF
An RV roof in good condition should feel solid, but it may be able to tolerate less weight along the ventilation ducts. It’s a good idea to note their location inside the rig before climbing onto the roof.
Now, climb up on the roof. If there is debris from trees, ask for a broom and brush it off so you can better see the condition of the roof. Look for holes, cracks, or unusual patches that have been made. Also, examine the spots where things like vents and such have been mounted. Are there cracks in the sealant?
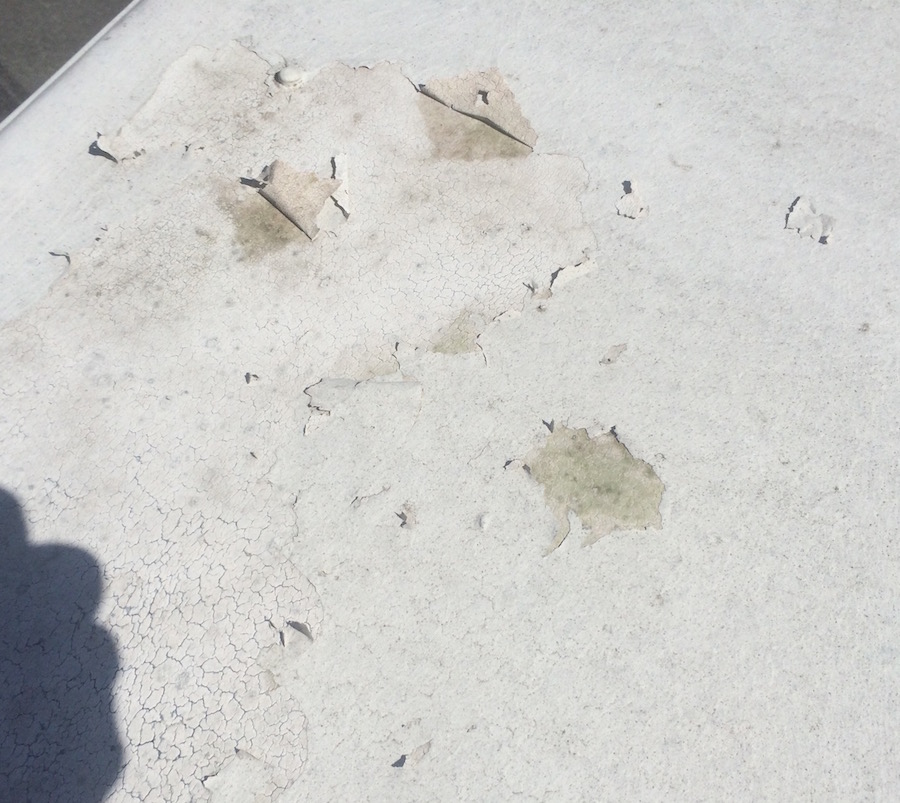
Aside from where your ventilation duct runs, are there areas of the roof that seem soft or seem to give way when you step there? If your roof is rubber, is it smooth or bubbled? Does the roof seem adhered, or does it have a puffy-like appearance? If it looks puffy, then there’s a good chance that water has gotten under it at some point.
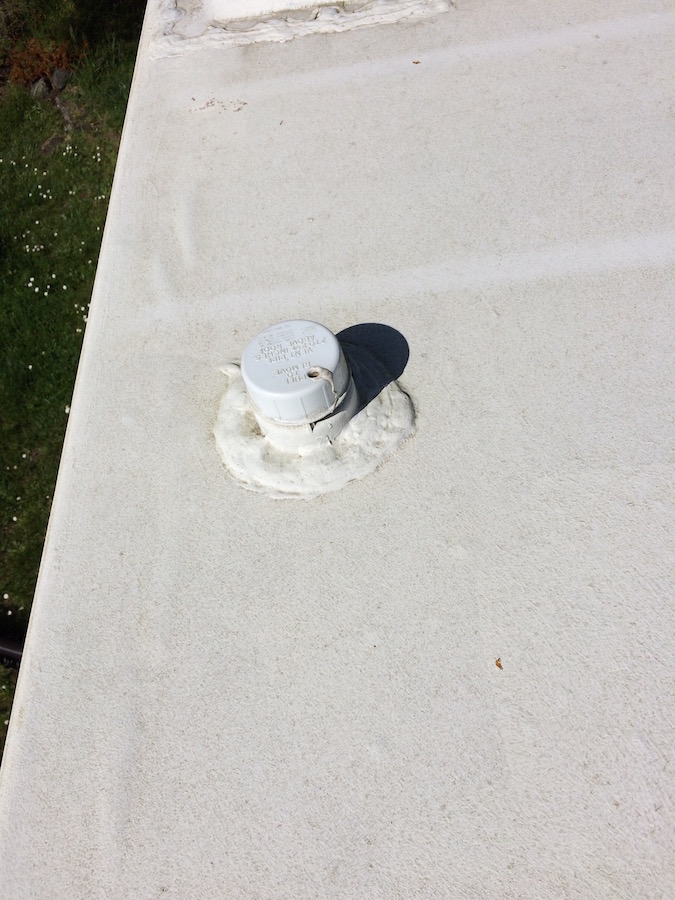
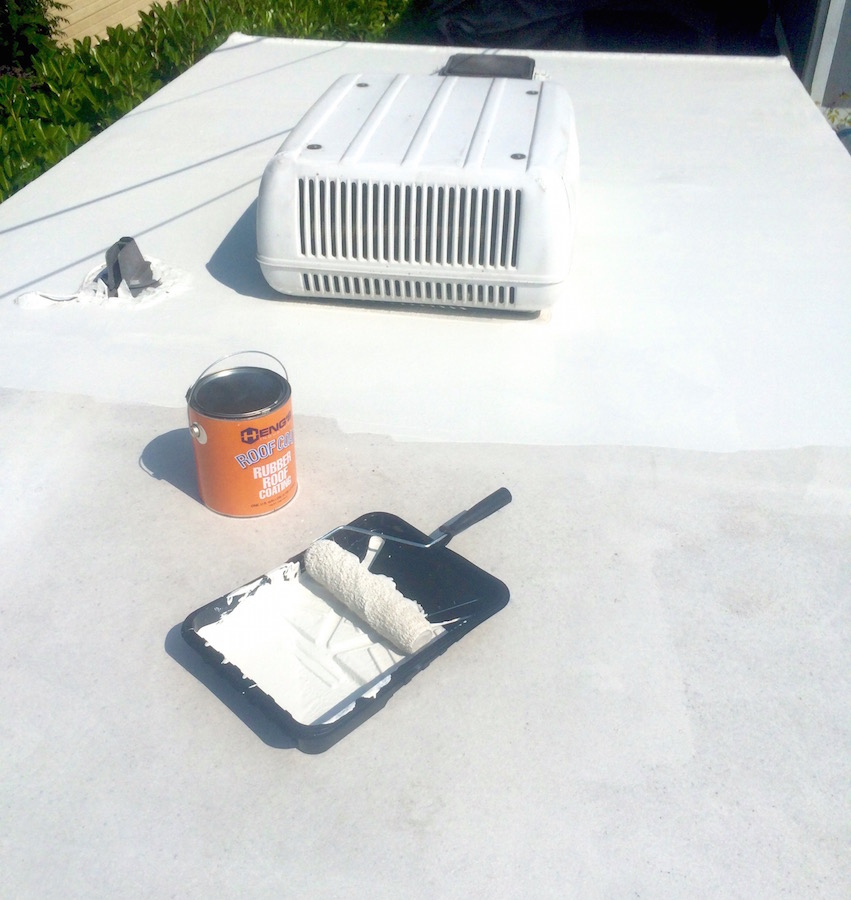
This picture shows a properly prepared rubber roof that is being carefully recoated with Heng’s Rubber Roof Coating. If you will be recoating your rubber roof, be sure to use a high quality product made specifically for rubber rooftops.
Make a note on a notepad or in your phone of where you see potential defects so you can inspect the inside of the RV at that spot when you go inside. Having a written reminder helps to keep you on track so that you don’t forget about questions you have when you are inside the coach. A good way to know where to look inside is to note it in reference to a marker such as a window or refrigerator vent. Be certain to check around the edges of the roof as many leaks appear here.
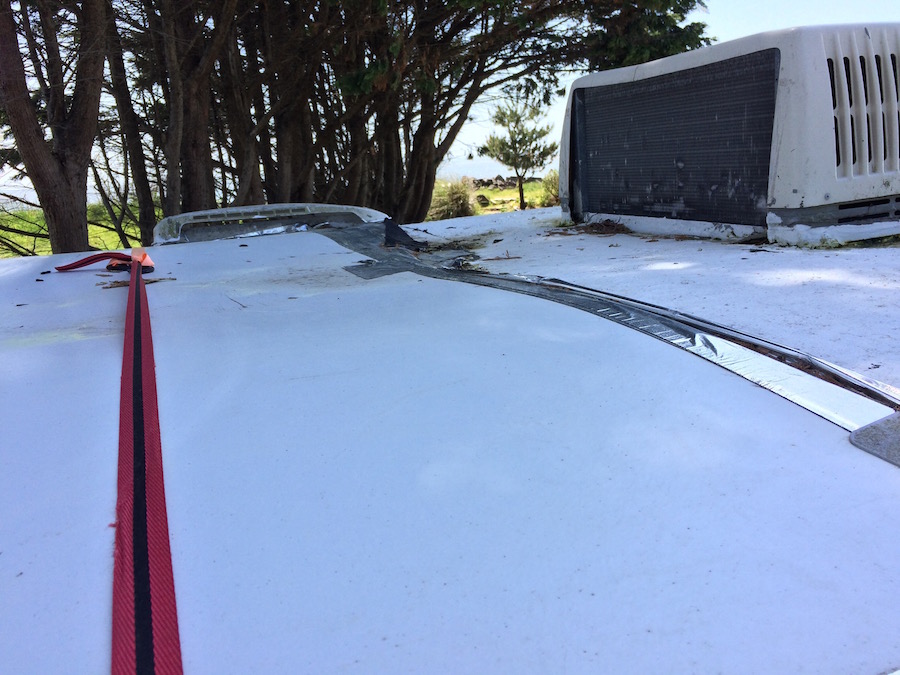
LOOK AT THE ROOF AC UNIT
While you are still on the roof, glance inside the shroud covering the air conditioning unit. It might be helpful to have a flashlight for this part, depending on the lighting.
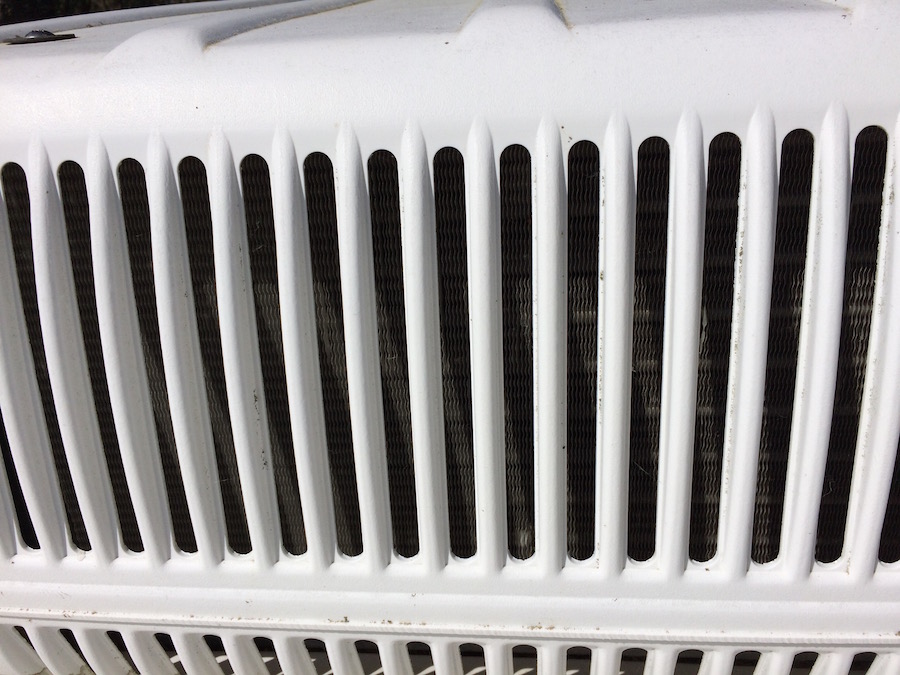
You likely will be able to see the metal fins. They look just like the fins you would find on a house air conditioner on the part that sits outside next to your house. The fins should be straight and not mashed in, and they should be clean and not covered in gunk.
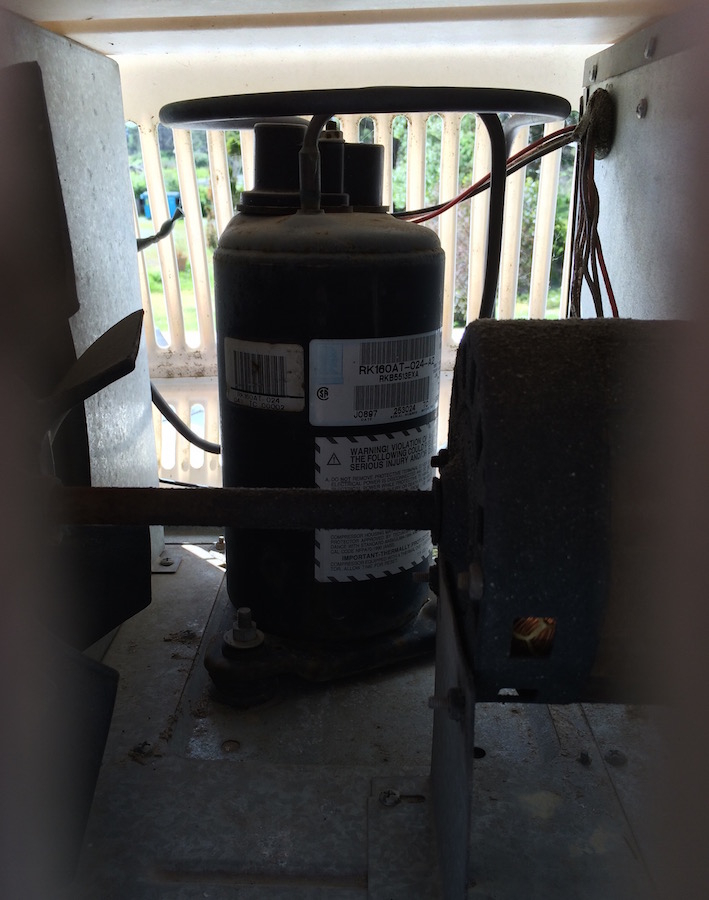
Also have a look at the compressor and wiring as best you can see them. Is everything rusted and are the wires frayed, or are they in decent condition?
If everything isn’t ok, you can replace the rooftop AC unit with a new one. Be sure to cover your RV’s AC unit with an AC cover when it is not in use.
DEPLOY THE STAIRS
Most RV stairs are electric steps driven by a motor, although some stairs are manual. If the RV you are looking at has the electric stairs, be sure that they work correctly.
This can be a bit tricky as there are several ways in which electric stairs are deployed. The simplest version is an independent rocker switch that will raise and lower the stairs when the switch is thrown one direction or the other.
If the stairs open and close ok, but are a bit wobbly (as they are prone to be), consider getting a stair stabilizer.
Another type of electric stair, which is quite common in newer models, has a sensor in the door that deploys and retracts the stairs when the door is open and closed, respectively. There may even be a light that will indicate whether the steps will operate with the door. Usually, if the light is off, the steps will deploy and retract as the door is open and closed. If the light is on, and the RV engine is off, the steps will remain deployed. Steps that operate in this manner should retract when the door is closed and the engine is on, but don’t bet your life on it. Always double-check before pulling out.
To figure out what kind of steps the RV you are inspecting has, ask the seller. If the seller is unsure, consult the manual (if there is one).
HOW DOES THE INTERIOR LOOK, AND (MORE IMPORTANTLY) SMELL?
Oftentimes you can find out just how poorly an RV has been maintained by looking at the interior decor. How do the upholstery, curtains, carpeting, blinds, comforter, wallpaper, etc. look? Are they stained?
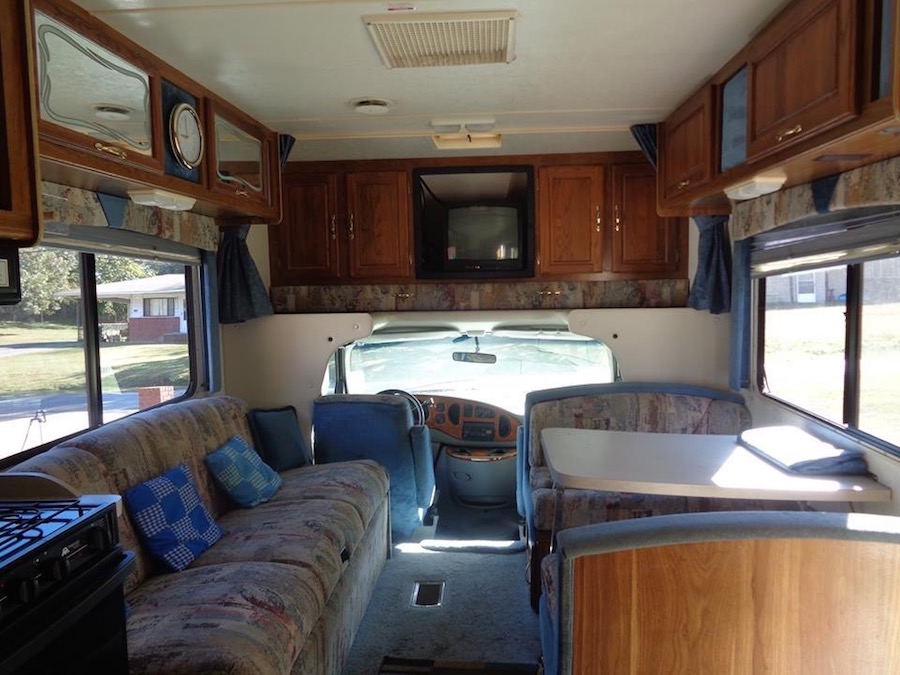
Does it stink? Do the fabrics have dry rot? If so, that’s going to cost you quite a bit to replace. Take that into account when negotiating a final price – if you decide you want a bit of a fixer-upper.
TURN ON THE FRIDGE
The absolute first thing you do when checking out an RV fridge is to open the outside back panel and look for any traces of yellow powder or liquid. If you see it, assume the fridge is bad and move on to the next inspection point. Don’t waste time troubleshooting it. Yellow powder or liquid shows that there is a coolant leak and repairing it costs about 2/3rds what a new fridge will run you. Generally, it’s best to just get a new one since the other components are probably old and will fail in short order.
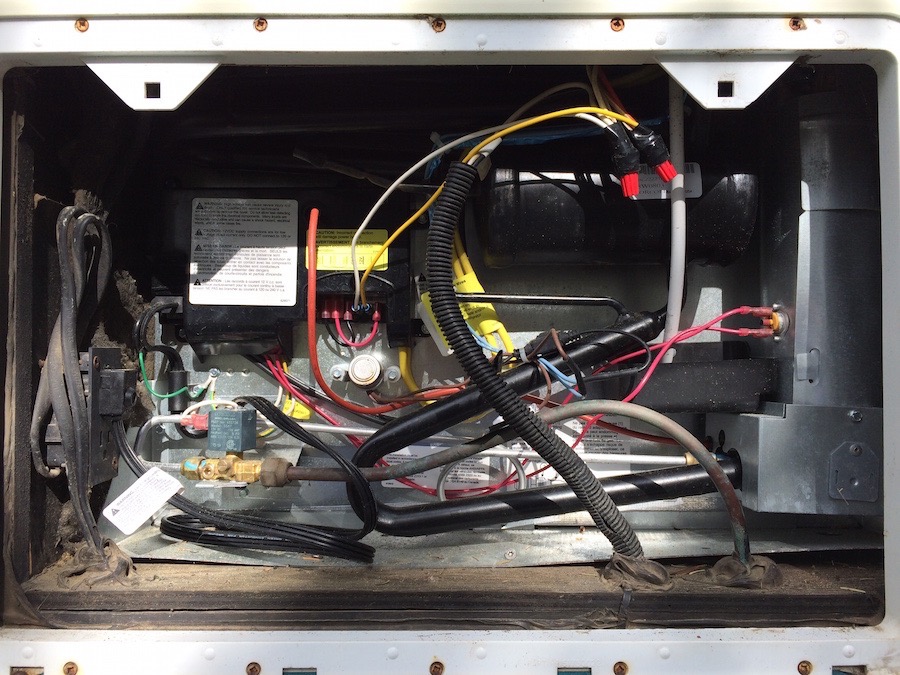
RV Fridges operate in several different modes, and what you need to test will depend on that particular model’s capabilities. Look inside the fridge for a label identifying the model number and either consult the manual that the seller has, or google it. Sometimes RV fridges show on their display all three modes: 110V, propane, and 12V, but only operate on 110V and propane. This is why checking the model number is important. That will tell you if you should check all three modes or just 2.
Start out by checking the propane mode. To do this, ensure that the propane tank has propane in it and that the valve is open. There also may be a valve on the back of the fridge which you can access through a panel on the outside of the rig. It is unlikely that someone would have turned off the propane valve at the back of the fridge, but check it just to be sure. The handle of the valve should line up with the propane line if it is open. If it is perpendicular to the propane line, it is closed.
Turn the fridge on with the power button. Next, set the selector on the front of the fridge to propane mode. This looks different on every model of fridge, but it may be a light next to the word “propane” or it may be an LCD display with what looks like a drop of water. The drop represents liquid propane.
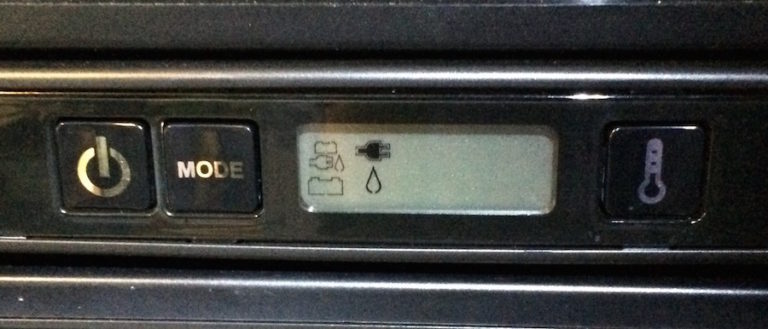
This is the panel on a newer model refrigerator – a Norcold NXA641.3 (the .3 means 3-way – propane, 120V, & 12V). There are two sets of icons. The larger icons represent manual settings and the smaller ones indicate that the refrigerator is on automatic selection.
If the fridge has not been run in a while, or if the propane bottles are removable and have been refilled, it may take several times to start the fridge in propane mode because of air in the lines. You may also run the stove burners to help coax out trapped air. It shouldn’t take more than a few minutes to get it to fire up. You should hear the burner ignite, but if not, you can go around to the back panel and hear the burner there.
If the fridge does not ignite there could be several issues. First, are the lights on the display coming on at all? If not, you may not be getting 12V power to the fridge. Without 12V power, you won’t get propane ignition. Alternatively, you may have problems with your propane. If your stove is lighting, you at least know that you have propane and it is flowing. If you know how, check the 12V power coming into the back of the fridge with a multimeter. If your stove works and you have 12V, it may be a stuck solenoid not opening to allow propane to flow to the burner.
On to testing 110/120V for the fridge with your multimeter… Once you are satisfied that you have your propane working for your fridge, go back to the front panel and switch it to 110. Again, this may look different depending on your fridge, but it is likely either a light next to a word like “AC” or simply “ON.” If you have an LCD display with pictures, it might be a picture of an electrical plug.
Once you have it set to 110/120V, let it run and come back at the end of your inspection to make sure it has started to cool. It won’t be cold by the time you are done as it takes a long time for RV fridges to get cold, but there should be a noticeable difference in temperature within half an hour to an hour.
You can check out your 12V system the same way you tested the 110V, assuming that your fridge has that function. Many fridges do not run on 12V alone. In older style panels, the selection may say “12V” or “battery.” If you have an LCD display, you may see a picture of a battery.
A word of caution: If you are buying an older RV that has had a new fridge installed, the existing wiring to support running 12V continuously is probably insufficient. Running continuous 12V as the power source for the fridge should be avoided until the wiring gauge has been verified to be thick enough. You can check with the refrigerator manufacturer for these specifications or consult the manual if it is available.
If you suspect that the fridge isn’t up to snuff, arrange with the owner to check back the next day after it has been running overnight. By this time, the freezer compartment should be very cold and the fridge should feel like the one you have at home when you open it up. If the fridge is not cooling properly, make a note to negotiate price based on the fact that you intend to replace it.
RV refrigerators start at around $1,000 for the cheaper models and go up from there. Do your research on the size and price of the fridge you would need to buy to replace it. If you call the manufacturer of the original fridge with the model number, they can tell you which new fridge model will fit in that space.
CHECK THE ROOF VENTS, FANS, AND CRANK THE ANTENNA
RV roof vents are easy to check. Just turn the crank one way to allow them to open and the other direction to close them.
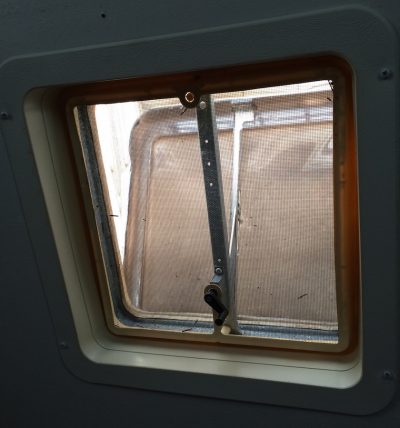
Bonus points if the RV you are looking at has vent covers which protect from rain getting into open vents. If you end up getting an RV that doesn’t come with vent covers, get some. They are a great way to allow you to ventilate your RV when you are away without having to worry about rain getting inside. Trust me on this one. You will want them.
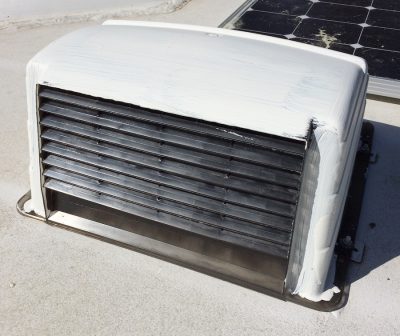
RV roof vent covers are easy to install and are a great investment.
Almost all RV’s have a fan in the bathroom and another one over the stove in the vent hood. Turn both of these on and make sure that they work without making a hideous racket. There are replacement fans for bathroom vents that do a much better job than the tiny ones that come with the RV. If you are looking for easy ways to spruce up your rig, this is a good one.
Crank the Antenna
If your RV has an antenna, it most likely cranks up for use when not underway. Make sure that it raises and lowers correctly.
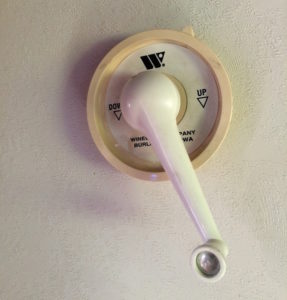
If the RV you are looking at is an older one, it probably has an analog antenna. You can easily upgrade to a digital antenna if you are a TV watcher.
While your attention is turned to the ceiling, look for any screws that seem out-of-place. Do they have a reasonable explanation for why they are there? Beware of random screws in the ceiling, because they could indicate that the ceiling has sagged.
If you see ceiling screws that look like they don’t belong, check your notes about the roof. Were there any questionable spots in the vicinity? Remember that water doesn’t always go straight down. If there was a leak and the RV wasn’t level, water may run laterally for a bit before finding a quick route down. With that in mind, look for potential sources of leaks several feet away from where you suspect there is leak damage.
TEST THE CONVERTER AND INVERTER
Before you plug the RV into shore power (household power), turn a few of the light fixtures on and off. If they come on, then you are sure that the 12V system is working. (Note: If your house battery is dead, they will either not work or they will run very dim.) Unhook the house battery. This will disable the 12V system completely.
Now, plug the RV into shore power and then go back and check those same light fixtures. If they are working, this means that the converter (the part that changes 110V into 12V) is functioning. Unplug from shore power and reconnect the battery.
Some RV’s may be outfitted with an inverter. Oftentimes this is a retrofit, but it may be present in a newer model RV as a standard feature. Inverters change 12V current from the battery into 110V and allow you to do things like charge computers, cell phones, run blenders, hair dryers, TV’s, etc. You can bring a small lamp or other easily transportable 110V appliance to test this out.
To test the inverter you will need to ask the seller if it is wired into the main power system or if it runs independently. Retrofits often run independently and people plug their appliances directly into the inverter.
If you find you need to replace the converter or the inverter, be sure that you get the correct amperage and wattage for your purposes.
TEST THE THERMOSTAT, FAN, FURNACE, AND AIR CONDITIONER
To test the thermostat and fan, stay unplugged from shore power. Set the thermostat to “Fan Only” and “On.” The fan should only require 12V which is supplied by your house battery. The fan should immediately come on.
Next, test your furnace. This should also function off of your battery alone. You first should ensure that your propane tank valve is open. Now set the thermostat to “Heat” and “On,” then set the thermostat to it’s highest temperature. There will be a bit of a delay. You should hear a couple of clicks, the fan should start running, and then you should hear the heater ignite with a whooshing sound. Usually, this is quite audible. Let it run for a couple of minutes and then feel by the vents (usually floor vents) to ensure that the air is hot.
Return to your thermostat and return it to the “OFF” position. Now plug in the RV to shore power.
Go back to the thermostat and set it to “Cool” and “On.” There will be another delay, followed by some clicks, the sound of the fan starting, usually followed closely by the sound of the compressor engaging. This is a low, humming sound that is distinctively different than the fan. Allow it to run for a few minutes, then check the ceiling vents to see if they are producing cold air. When you are finished, return the thermostat to the “off” position.
RUN AND PUT LOAD ON THE GENERATOR
Many RV’s come with an on-board generator. Start by asking the seller if the generator has been recently serviced or has had regular maintenance. To keep a generator in shape, you need to perform regular maintenance just like you would on a car engine. Many of the same things apply: fuel filter, oil filter, spark plug, etc. They also suffer from things such as clogged fuel lines and gunked up carburetors when allowed to sit unused, especially if fuel containing ethanol has been utilized. You have probably experienced similar problems if you have let your lawn mower sit with fuel in it over the winter without adding stabilizer.
Generators usually have a switch inside the coach with which to start them. This is probably also accompanied by a meter which checks the hours that have been put on the generator. If you are unable to find the inside switch for any reason, there should be a manual switch on the generator itself.
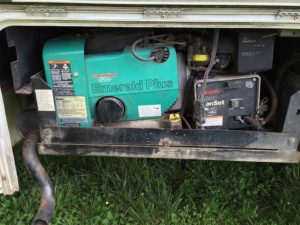
Onboard Onan 4000 Genset generator. These are quite common in RV’s. Note the manual start/stop switch on the black box on the right-hand side.
When you go to start it, note how many attempts it took and how the generator sounded. Did it fire right up, or was it sluggish? If it has not been run for some time, the generator may need additional cranking to prime the fuel system. Once it is running, listen to it idling. Is it a nice, smooth hum, or is it loud and uneven? If the initial start was slow and required several attempts to start it, turn it off and crank it again. Once it has been running a few minutes, you may assume that it should be adequately primed. The second attempt to start it should go smoothly.
Now you need to put the generator under load to see how it handles. One of the easiest ways to do this is by running the air conditioner. To make sure you are working off of 120V from the generator, unplug from shore power. One of two things may happen. Either the generator is automatically used by the RV to provide 120V power, or you must make a manual connection. If the AC starts while the generator is running, then there is likely a critter onboard called a “double pole double throw switching device.”
If the AC worked when you plugged into shore power, but doesn’t work now, then you may need to locate a specialized socket on the RV into which you plug the same power cord that you normally use to plug into shore power. This special socket is likely located near the power cord. Be sure to turn off the AC at the thermostat before connecting the plug. Once it is connected, go inside and repeat the process of setting the thermostat to “Cool” and “On.”
If the air conditioner works now, then allow it to run for a bit and listen to the generator. It may sound like it is working a little harder, but it should still produce a nice, even running sound. If your AC fails to run at this point, ask the seller to produce an item such as a hair dryer and plug it in and run it. This is far less of a load, but it may tell you if your generator is producing at least some power. If it can’t run the AC, but can run a hair dryer, then you probably have some underperformance issues that need to be troubleshot by a professional. Keep this in mind when negotiating the sales price of the RV.
CHECK ALL INDOOR AND OUTDOOR LIGHTS
Turn on all light fixtures in the RV. Don’t forget the ones above the stove, the bathroom vanity light, and the outdoor lights. If a fixture doesn’t work, try and remove a bulb from a working fixture and see if that fixes the problem. If several lights are out, you may have a blown fuse.
Once you have your RV, consider swapping out the standard bulbs for LED’s, especially if you are planning on being off-grid. The LED bulbs save tons of power and are a solid investment.
CHECK OUT THE PROPANE TANK(S)
Take a look at the propane tanks supplied with the RV. What does the label tell you about its most recent inspection date? If it is a mounted propane tank and is older than 12 years, it must be reinspected every 5 years. If a mounted propane tank is in bad repair, it will need to be replaced, and that can cost a bit of money.
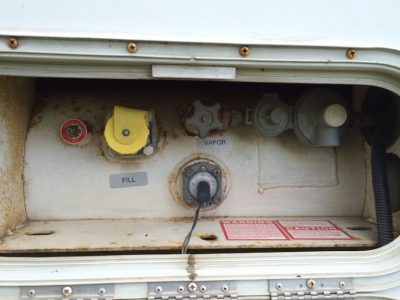
This is an example of an older model (1998) body mounted propane tank with a QCC valve. Note the old-style hand wheel shut-off knob (above the word ‘vapor’). Because this particular model was manufactured prior to 1998, it cannot be retrofitted with a newer, triangular shaped shut-off knob equipped with an OPD (overfill protection device). Also note, that there is no recent inspection sticker showing that this tank, which is older than 12 years has been inspected for safety. Some propane dealers may refuse to fill the tank because of this.
You should also look at the valve to make sure that your tank is equipped with an OPD valve. This is a type of valve that protects from tanks being overfilled. You can recognize OPD valves by the triangular shape of the hand wheel that operates the valve. Getting an old style valve swapped out for an OPD valve is not usually difficult when having the propane tank inspected, but it’s just a little more money you can expect to spend when getting your new-to-you RV up to code.
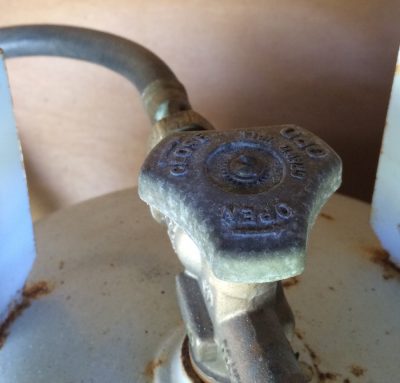
Inspect the propane hoses coming off of the propane tank. It is possible for these to dry rot, and leaks in propane can lead to a deadly situation. Regulators that are over a decade old may leak and should be replaced if a leak is spotted.
You can also check the hoses and regulator for leaks by using gas leak detection solutionwhich you can find at any local hardware store. It works like soapy water and bubbles wherever there is a gas leak. Although water and dish soap can do a similar job, the gas leak detection solution is better at finding very small leaks.
For a more professional inspection you can purchase a gas leak detection device to sniff out leaks for you.
TEST PROPANE (LP) & SMOKE DETECTORS
Propane detectors are usually located near the floor in an RV, and funny enough, many dog owners report that their dog’s flatulence at night has set them off if the dog is sleeping near the detector. Many propane detectors have a “test” button, but some do not.
If yours doesn’t have a test button and you don’t have a dog that can pass gas on command (what a cool party trick that would be, huh?), the best way to test a liquid propane detector is to get one of those long-stemmed barbecue grill lighters, ignite it, and then blow out the flame while still holding the button to allow the propane/butane to flow through it.
Many people argue that the test button isn’t a true test of whether the LP detector can actually detect propane, so they choose to test with an unlit propane lighter. The same goes for smoke alarms. There is usually a test button, but you have to actually have smoke to really find out if it has actual smoke detection capability.
HAVE A LOOK AT THE PLUMBING
Ask the seller to partially fill the fresh water holding tank. Go in and turn on the water pump and see if it provides water to the sinks, toilets, and shower head. When you are done, go back and look at the fresh water tank to see if there are any leaks. It may be partially visible through a hatch from the outside. Freshwater tanks are usually kept under the bed, so accessing them can be difficult, but do your best and check for leaks on the ground once you are done.
If that checks out, then hook up the hose to the rig and re-test. After you hook up the outside hose and turn on the water, do you see any drips on the outside of the rig?
Now go back inside to look for leaks again. This time, have some toilet paper and a flashlight with you. Get under the sinks (and behind the toilet if possible) while they are running and take a few sheets of toilet paper and put them around the connections of the pipes one at a time (drains included). Each time you touch a pipe with toilet paper, pull it away and look for wet spots. There should be none.
Fill up the sinks with the plugs in the drains and then drain them. Do they drain quickly, or does it take time for the water to go down? What about the shower? Does the drain work well in there? Does the toilet flush correctly? If you fill the bowl with water is it still there when you come back in 5-10 minutes? If not, you may have a bad seal on your flapper. This is important because the flapper with water on top is the primary way that the smell of your black water tank is kept out of your rig.
Turning our attention back to the plumbing, look for changes in pipe color where there are transitions. When an RV is built, the pipes were probably all built from the exact same materials. If you spot something that looks different, that may be a repair. If something was repaired, then there was likely damage done. Be extra diligent in looking for damage near these areas.
While you are under the cabinets, use your nose to detect any damp smells. Use your flashlight to look for dark water marks on the floor, on the walls, and the underside of the counter. Many things in RV’s are made from particle board which will swell if it has had contact with water. Look for this type of damage and try to figure out where it originated. Remember, water flows downward, so if you see a problem, it came from above that spot somewhere.
CHECK OUT THE FLOORING
In order to check for flooring problems, step all over the floor and apply a bit of extra force. If it gives anywhere, then you likely have a problem. See if you can (or if the seller is willing to) pull back the floor covering so you can see the floor underneath.
Be sure to spend extra time examining the flooring near plumbing fixtures, the toilet, and shower, as these are likely places you may have problems. However, leaks from plumbing aren’t the only reasons you may have water damage to your flooring. Other causes can be leaks from the roof, windows, or the outside rim of the floor where the walls are joined to the floor. As strange as it may sound, a leak in the roof may not be noticeable anywhere on the RV until it reaches the floor.
TRY THE HOT WATER HEATER
Although some people enjoy cold showers, odds are you probably aren’t one of them. Hot water heaters commonly fail due to poor upkeep and maintenance.
Before igniting the hot water heater, locate the hot water heater vent on the outside of the coach. Open it and determine if it is a propane or electric heater. If it is a propane heater, look at the burner. Is there debris in it? If so, blow it out with some compressed air.
Ensure that the valves to the hot water heater are open. They may be closed off for winter storage. You will probably find these bypass valves right next to the heater. Locate the heater and then follow the water lines away from it. You should see valves. Open them and then run water from the hot water side of the sinks and shower. This will allow the tank to fill and purge the air.
Once the air has been purged, ignite the water heater. There is probably a switch on a panel inside the RV for this. A delay of several seconds before a propane style water heater ignites is normal. Some newer models of RV’s use both electric and propane heat. See if the seller knows what is on board. In very new models you may encounter on-demand hot water. These are becoming more common and could have been installed retroactively by a previous owner.
Assuming the RV you are inspecting has a water tank and not an on-demand tankless water heater, let the water heater run as you continue your inspection. After 20-30 minutes, come back and run the hot water. It should be moderately warm by then. It takes approximately 45 minutes to heat 5-6 gallons of water to “hot.”
GIVE THE WASTE WATER TANKS A ONCE-OVER
This can be a bit of a challenging task given that most people don’t have dump stations on their property, but do your best to check for leaks in the black (toilet) and gray (shower & sinks) water holding tanks. They may be located under the rig (like on a 5th wheel or trailer) which makes them especially prone to damage from being bumped, or they may be enclosed in an underside compartment (like on a Class A or C model).

If you spot any suspicious drips, turn on the water inside again and then go and watch to see if these leaks persist. Replacing the tanks when they are exposed isn’t super difficult, but replacing them when they are enclosed can be extremely hard.
If you are serious about purchasing the RV and don’t plan to have a professional inspection done, be sure to arrange to take the RV by a dump station (you can find one on www.sanidumps.com). Fill and dump over and over, being sure that the valves to the gray and black water tank open and close completely. Leaking valves can lead to an awful mess when the tanks are in use.
TEST THE STOVE & OVEN
Light all of the burners on the stove and turn on the oven. They should all work. If the RV you are looking at has removable propane bottles, it is not unusual to have a bit of air in the lines after having taken them off and refilled them. It may take a few seconds to light the first time, but after that they should light immediately when turned on. Note that some stoves may have electric ignition, while others require a match or a lighter to ignite the propane.
HAVE A LOOK AT THE FUSE BOX
Locate the fuse box for the RV. It is probably inside somewhere near where the shore power cord comes out of the RV. Do you see any black, soot-like marks? In what condition are the wires coming in? Do you see any melting or discoloration from heat? Do all of the wires look similar, or does it look like different styles of wires were added at a later date?

If you suspect that new wires have been added, be sure to ask the seller why this was done. Go back and consult the coach manual and find out what size fuses should be in place (many are commonly 15 amp). If the fuses present exceed what the manual states they should be, then something was likely blowing that fuse. Having higher amperage ratings on fuses is a dangerous situation. Fuses (and circuit breakers) are safety devices meant to blow or trip to stop electrical current in a dangerous situation. Find out all you can from the seller about what you see that looks suspicious.
Also check the breakers to make sure they flip on and off properly. A bad breaker switch will likely not stick in the on or off position. If you find a bad breaker, look to see if there is identifying marking that tells you what it powers. There may be a problem with that device, or something extra may have been added to that circuit.
Pro Tip: Glowing fuses make it super easy to spot a blown fuse because they light up when they burn out. They can save you lots of time and headache trying to track down an electrical problem.
CHECK OUT THE CABINETS AND DRAWERS & INSPECT FOR MICE
Open every cabinet and every drawer. Make sure that they work correctly. RV’s have special closures on their drawers and cabinets that keep them shut during travel. Make sure that these have not ripped free and that if something is loose it can be retightened. This is also a good time to test the refrigerator/freezer doors to make sure their latches hold the doors closed properly.
While you are doing this inspection, keep your eyes peeled for mouse droppings. RV’s that are stored most of the time can quickly become infested with mice looking for a nice, dry home. They can chew through wires which can be a fire hazard, in addition to the droppings being a general health hazard.

PULL OUT THE AWNING
One item that is easy to forget about when inspecting an RV is the awning. Some fancier models have electronic awnings, but most are manual. If the RV you are inspecting has a manual awning, ask the seller to show you where the deployment switch is.
HOW TO PULL OUT A MANUAL AWNING
For manual awnings, you should find an awning rod among the RV tools. Awning rods are about 3’ long and have a 90 degree bend on one end (for grabbing the awning cord) and a loop on the other end (for you to hold by putting through a finger).
First, undo the latch that holds the arms in place for transport (this is usually a clip that you flip up and out of the way on each arm) and loosen the sliding arms (this is usually a round knob located on the back side of the arm on each arm).

The awning should have a dangling cord, probably somewhere above the door. Hook it with the bend in the awning rod and pull firmly as you back up away from the side of the RV. The awning should unroll and as it does so, the top of the main arms should come outward with it. They will still be connected to the RV at the bottom.

Keep ahold of your strap and slide it along the awning roll until you reach one side of the awning. (If the strap isn’t in good shape, you can replace it with a new strap.) Still holding tension on the cord, reach out and grab the sliding arm of the awning (the one with the round knob) and pull the bottom of it up along the length of the main arm until it clicks into place with a latch that is located at the top of the main arm.

Tighten the knob to secure the secondary arm. This will keep it from collapsing and allowing the awning to roll back up. Knobs are also easily replaced.

Slide the strap over to the other side (you probably don’t have to pull against it much now) and repeat the process of deploying the second arm. You may now let go of the strap.
The next step is to unhook the bottom of the leg from the clasp that holds it to the RV.

Grab ahold of the bottom of the leg, release the clasp, and carry it out to where it is directly underneath the awning roll. It should now look like a pole coming up from the ground and supporting one side of the awning. Repeat this process with the other arm.
Your awning is now deployed. It is normal for the awning to be a tiny bit resistant when opening it, but it should not be a major ordeal. If it is not coming out when you try to pull it, ensure you have unlatched and loosened the primary and secondary arms properly.
Examine the awning for holes and tears. Check out where the awning is bolted to the RV – are the brackets straight up and down, or do they bow inward? If they bow inward, there may be water damage behind that point.
Awnings can be replaced modularly, fabric running around $300-500 and hardware runs around $400 or so. If your awning isn’t in good shape, be sure to make a note for negotiating prices.
CHECK UNDERSIDE HATCHES AND COMPARTMENTS
Your complete set of RV keys should contain keys for the automobile portion (if it’s a motor home), keys for the coach door, and keys to the underside hatches. You may also be given keys to the hitch if it has a lock.
Open each and every hatch. Inspect the locks. They are notoriously sticky, so don’t be too deterred if they don’t open right up. Are they dirty? Cleaning and greasing them can help this problem.
Plan on always fighting a bit with them as this is part of being an RV’er. You can replace them if they are really bad with new compartment locks.
If you can see how the underside compartments are attached to the RV, look for cracks in the plastic that might indicate the compartment was overloaded at one time or another. Also, check for the amount of dirt in the compartment. Is it more than a tiny bit?
You may have bad seals on the hatches (likely if the RV is older) or a crack in the compartment that is letting in dirt. If dirt can pass through, then you can count on moisture to get in as well. This doesn’t have to be rain. General humidity can get in and cause things to mildew – especially if you are in an environment full of water such as the coast.
But what if the owner has lost the key to the hatches? It’s probably not a big deal as there are only a few keys for all RV locks. Yep. You read that correctly. Ask that the owner contact an RV dealership to obtain the keys. Locks usually have a code on them that will identify the correct set of keys.
OPERATE THE SLIDES
Slides can add some serious room to your RV, and if you are living in one full-time, they can make things seem a lot less cramped. However, slides come with a number of inevitable problems, so be sure to check out these issues before buying a used RV with slides.
First, slides can be operated by a number of mechanisms: electric gear motors, hydraulic rams, or electric screw extenders. Regardless of what kind you may have, they can (and will eventually) fail and require replacement. So, when you find yourself checking out a used RV, be certain to extend and retract the slides. Is the motion seamless? Does it seem to stick and jump? If they don’t work perfectly, try adding some slide out lube that is made for this. If that doesn’t help you may be looking at replacing them not too far down the road.
Another problem with slide outs is that the seal which keeps out water is rubber and rubber wears out over time. As the rubber dries out and hardens, it will no longer have the same pliability that once allowed it to grip the slide and form a good watertight seal.
Be sure to feel the rubber around the slides before buying a used RV. If it feels stiff or brittle, beware. If you still want to buy the RV, look for water damage inside that has happened as a result of this poor seal. To keep seals in good shape, be sure to use seal conditionerregularly to keep the rubber nice and pliable.
Some manufacturers have put kitchens in slide outs. This isn’t the best idea for a couple of reasons. One of the main problems is the fact that water pipes and propane lines may have to move to accommodate this design. In an ideal world, these things are fixed and don’t ever get moved.
A second problem is that the weight of refrigerators on slides tends to be too much sometimes and can cause problems with the slide mechanisms. Living rooms and bedrooms do not seem to have as many issues as kitchens, but you should be diligent in your inspection of all of the slides, regardless of what part of the coach they expand.
CHECK THE WINDOWS, SCREENS, AND LATCHES
Take time to open and close all windows and screens. If the windows are very difficult to open and close, there may have been leaks that have caused the surrounding materials to expand. Sticking windows can also be caused by dirt and dust that may have accumulated in the track where the window slides.
Test out the latches to make sure that they lock properly and also make sure the screens are in good shape. Replacement window latches are also available. Be sure you get the kind that matches what you already have.
Take the RV Out for a Spin
The test drive is a must when buying any vehicle. It can tell you a lot more about a vehicle’s history and potential problems. Even if you are buying a 5th wheel or trailer, the test drive is just as important, so don’t skip it.
CHECK THE BACKUP CAMERA
Some RV’s come with or were retroactively fitted with backup cameras. These things are worth their weight in gold. Not only do they help you when backing up, but they allow you to constantly monitor any vehicles you may be towing. If you have a flat on a towed vehicle (referred to as a “toad”), you may drive for quite some time before noticing, which can cause major damage or even set the vehicle on fire. Be sure that you have a good, clear picture of what is behind you before heading out.
If the RV you are looking at doesn’t have a backup camera, you can install one yourself. If you aren’t too excited about pulling wire all through your rig or you have a trailer or 5th wheel, wireless backup cameras also exist.
HOW DOES IT FEEL?
Do the brakes have a nice firm resistance, or are they mushy? Does the RV pull to the left or right either when driving or braking? (You can test this in an empty parking lot by briefly letting go of the wheel at about 20 mph.) Is the steering good and tight or is it loose?
Are there any noises that don’t seem normal? Does it climb hills ok, or does the engine seem too strained as if there isn’t enough power? Don’t forget you are driving it without all of your stuff on board. This added weight will make more work for the engine as well as the brakes.
GIVE IT A GOOD WORKOUT
Most sellers will expect you to take the RV around the block, but you should take it through its paces. Begin by placing the RV in reverse. Is there a delay or a clunking noise? Put it back in park. Now put it in drive. Observe if there is a delay or a clunk. These could be indications that there is a transmission problem.
Go up and down hills, through stop and go traffic, and get it out on the highway for a few minutes. This will give you a good idea of how well the vehicle can accelerate, decelerate, and how well it handles at speed. It will also let you know a bit about how well your transmission is functioning as your driving will require it to shift through a number of gears. If you notice that when you give it gas that there is little or no acceleration and the tachometer is climbing, this may be a sign of early gear slipping.
PAY ATTENTION TO VIBRATIONS OR SHIMMIES
When you get above 50 mph, do you detect any shimmy or vibration in the front end of the vehicle? If so, you could have a bent wheel or the balance may be off. These could be caused by hitting big bumps or potholes and can be addressed by a new wheel or alignment. That is the best case scenario.
It is also possible that the shimmy is caused by damage to the driveline or suspension, and these problems are far more serious (read: costly). If you sense a shimmy, start coasting. Is it still there? Does it also happen when you accelerate? These may be problems in the driveline or chassis.
Next, give it some juice to boost the RPM’s. If you only notice the vibration then, your problem is more likely related to the engine. This may be as simple as a belt or it may be a broken drive mount.
GAUGES
Don’t forget to keep an eye on the temperature gauge to see how well the engine cools when it is put to work.
ARE YOU COMFORTABLE?
Although it will be awkward for you to drive such a large vehicle (unless you are already accustomed to driving RV’s), try to figure out if you are comfortable in this particular rig. Can you see out of the side mirrors adequately? If there is a backup camera, does it work? Is the lens clear?
If you aren’t sure if you are comfortable, try test driving a number of different RV’s and see which ones suit you best. Your comfort level overall will improve the more you drive them, so don’t be turned off by the feeling of driving a large vehicle.
FEEL THE HUBCAPS
After taking the RV out for a test drive, immediately get out and touch the hubcaps with your hands. Are they warm? What about hot? If you have done a considerable amount of braking – like while descending a hill during your test drive, the hubcaps may be a little bit warm. This is normal and is just a sign of heat dissipating. If, however, the hubcaps are very warm or hot, you may have a stuck caliper or other braking problem. Sniff around the wheel of the hot hubcap and see if you detect a burning smell. If there is one, this is a big clue that you may have serious brake problems to address.
CHECK FOR LEAKS AGAIN
When you are back from your test drive, pop the hood and look again for leaks, hisses, etc. Re-inspect the brake lines, and don’t forget to check on the ground for new drips.
THE PAPER TRAIL
One of the best ways to research an RV is to contact previous owners. Sometimes this information is unknown, and sometimes the current owner has that information. If you can get your hands on it, find out what the other owner(s) know about the RV before you do any negotiations on price with the current seller. This can save you loads of time if they disclose a wreck, flood, or other event that may have caused significant damage to the RV.
Pro Tips: If the current owner says that the identity of previous owners are unknown, check in any paperwork that you are shown for the RV. You may be lucky and run across an old proof of insurance card or other piece of paper with their names.
If that doesn’t work, call the manufacturer of the RV with the VIN number (this is located inside the driver’s door on a motor home, but may be on the tongue of a travel trailer or inside a kitchen cabinet on a 5th wheel). The manufacturer can tell you what dealership originally purchased the RV. Once you have that information, contact the dealership with the VIN and tell them you are trying to contact previous owners before purchasing a used RV. They may give you that information.
A final option would be to contact the county assessor’s office and/or DMV to see if there is any public information about the previous owners of the RV. You would be surprised at what information is available. If the first place you call doesn’t want to give you anything, try a different location. Most counties have several locations for assessor and DMV offices.
RUN A CAR FAX & PAY FOR A PROFESSIONAL INSPECTION
Before you sign on the dotted line, get the VIN number and run it through the CarFax service. You can do this if it’s a motor home. Since trailers and 5th wheels are not a type of motor vehicle, they aren’t covered by CarFax. In this case, you will have to rely on the seller to tell you if there has been any damage to the vehicle via an accident or flood. Hopefully, by now, you have already inspected enough to tell on your own whether you should be concerned about the answer you are given. When in doubt, pass. There are plenty more fish in the sea.
If things check out with the CarFax, or if you are looking at an RV for which there is no CarFax service, your next step is to pay for professional inspections of the automotive and coach parts of the RV. These are different specialities. Most RV technicians are not automotive specialists and vice versa. It is worth the money to pay two people who are each good at what they do rather than pay a single person who is good at one thing and only so-so at another.
An automotive inspection will likely cost around $150-250. The only tricky part here is that you may need to find a place that has a lift and a garage large enough to accommodate your rig. Many places, when they hear the word “RV” will say that they don’t do those. Be sure to inform them that you are just asking for an evaluation of the automotive part. If they still say they won’t do it, ask them who they recommend.
The RV coach inspection will cost you about $200-300 because it takes quite a while to do. Many dealerships offer this service via their RV technicians. Even if they aren’t selling you the RV, most places will be happy to check out one you are considering buying. It’s a service, just like anything else.
Check around and find a good RV dealership in your area with reliable RV technicians. If you don’t know where to start, try shooting a Facebook message to your friends asking for help. If they don’t have an RV, they probably know someone who does. People are always willing to share bad experiences as well as promote companies/service departments who have been very helpful. You may even run across mobile RV (or automotive) technicians who will come to you.
Hopefully, this guide on what look for when buying a used RV has pointed you in the right direction and you have found your perfect RV.
See you on the road!
